Monthly Archives: May 2025

Growing Exotic Citrus

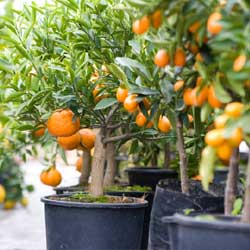
Citrus trees grown in fancy terra cotta pots, light-weight decorative containers or wooden planters can be used to adorn your garden, no matter how small it is. Use a potted citrus as a centerpiece for an herb garden, place several in a series on your steps or decorate your deck with these grand-looking accent plants. Dark, glossy green leaves look beautiful all season long while colorful, healthy fruit dangles enticingly from the branches. Although citrus plants are not winter hardy in the north, they may be moved indoors during this time. For added pleasure, citrus offers weeks of fragrant flowers in the spring.

Top Citrus Picks

There are several varieties of exotic citrus trees that can be stunning in the landscape. The most popular options include…

  • Calamondin Orange – This cross between a mandarin and kumquat produces miniature oranges that are somewhat tart but make excellent marmalade.
  • Ponderosa Lemons – Producing fruits that weigh up to a whopping 5 pounds each, Ponderosa Lemons have a thick ring with very little juice.
  • Variegated Pink Lemons – This lemon has variegated foliage and produces a yellowish-pink fruit.
  • Meyer Lemon – Although not a true lemon (it is said to be a cross between a lemon and either an orange or mandarin), the Meyer Lemon is one of the sweetest lemons.
  • Key Lime – Also known as Mexican Lime, this selection is highly prized for making Key Lime Pie. The plant is very thorny and produces small aromatic fruits.
  • Goliath Pummels – The largest of all citrus fruits, pummels taste similar to grapefruit.
  • Blood Orange – Having an unusual red flesh, these oranges are prized by gourmet cooks for their slight berry-like flavor.
  • Flame Red Seedless Grapefruit – This grapefruit variety produces medium-sized pinkish-colored fruits.
  • Cocktail Trees – These are a grafted tree that usually contains 4 to 5 different types of citrus on the same plant, great for your own fruit salad in minimal space.

Citrus Care

Place citrus plants in a sunny location where they will receive a minimum of 6 hours of sun to ensure the best possible fruit. Water regularly and feed with a fertilizer listed specifically for citrus plants every two weeks. During the summer months, citrus plants will produce a lot of new growth. In the early fall, before bringing plants indoors, prune citrus plants back about 1/8 of their existing size. This will help to minimize the shock that plants often experience when being moved. Use a humidity tray indoors or mist daily. Avoid placing your plant in a drafty area or by a heating vent. Provide a minimum of 6-8 hours of daily sun or very bright light in the winter months. It may be necessary to supplement with an artificial light source at this time of the year to keep the plant at its best.

It may seem unusual to have strange citrus trees in your yard or even right inside your home, but with a little care, you’ll be amazed at how much fun these plants can be to grow, and their sweet fruit is a wonderful reward for your efforts.

Citrus

Shade Gardening: A Natural Opportunity

Although developing a garden for a shady area may require a little extra planning, some more thought and a bit more effort than sunny spaces, there are many opportunities to grow remarkable, unusual plants in the shade garden. Shade-loving plants are often noted for their foliage and can be combined to produce appealing contrasts in form, texture and color. From the glossy, dark greens of camellias and rhododendrons to the soft, silvery lamiums and the bold-textured, brownish-purple leaves of bergenia, the diversity of foliage available is positively breathtaking!

Defining Shade

The term “shade” encompasses many light conditions. Shade can range from dense darkness to the light-dappled shade under a birch tree. Most plants require at least a few hours of direct light each day (light shade) to look their best, especially if they feature bright colors in foliage or blooms. Some plants, however, do best in an abundance of filtered light (medium shade), especially if the shade is provided in the afternoon to cut the strongest rays of the sun. In the meantime, a few plants can thrive in the darkness of a forest (dense shade), without ever being exposed to bright, direct sunlight.

Other factors you will need to consider when planting your shade garden are the amount of moisture your shady spot receives and the soil conditions. The soil under large trees is usually dry because of the “umbrella” affect created. Other locations may have soggy soil that will only allow bog-type plants to grow. The soil’s drainage, pH and texture will all have to be taken into account to create the best shade-loving garden.

Not sure where to start for finding plants for a shade garden? Top shade-loving perennials and their requirements include…

Perennials for Dry Shade:

  • Convallaria majalis (Lily of the Valley)**
  • Dicentra ‘Luxuriant’ (Bleeding Heart)*
  • Epimedium perralchicum, pinnatum, pubigerum (Bishop’s Hat)*
  • Geranium maculatum, endressii, nodosum (Cranesbill)*
  • Helleborus foetidus*
  • Lamium maculaturm (Deadnettle)*
  • Polygonatum multiflorum (Soloman’s Seal)*

Perennials for Cool, Moist Soils in Shade:

  • Adiantum pedatum (Maidenhair Fern)**
  • Athyrium nipponicum ‘Pictum’ (Japanese Painted Fern)**
  • Cyrtomium (Japanese Holly Fern)**
  • Dryopteris erythrosora (Autumn Fern)**
  • Dryopteris marginalis (Marginal Shield Fern)**
  • Epimedium grandiflorum, warleyense*
  • Helleborus viridus, orientalis (Lenten Rose)*
  • Mertensia virginica (Virginia Bluebell)**
  • Polystichum acrostichoides (Christmas Fern)**
  • Polystichum setiferum ‘Divisilobum’ (Soft-Shield Fern)**
  • Tiarella cordifolia (Foam Flower)*
  • Tricyrtis formosana (Toad Lily)*
  • Trillium sessile, grandiflorum**
  • Trollius europaeus*

Perennial Groundcovers in Shade:

  • Acanthus mollis (Bear’s Breech)*
  • Aegopodium podagraria ‘Variegatum’ (Goutweed)*
  • Asarum europaeum (European Wild Ginger)*
  • Galium odoratum (Sweet Woodruff)*
  • Lamiastrum galeobdolon ‘Florentinum’ (Variegated Archangel)*
  • Lamium maculatum ‘Beacon Silver’ (Dead Nettle)*
  • Luzula sylvatica ‘Marginata’*
  • Tiarella cordifolia (Foam Flower)*
  • Vinca minor*
  • Waldsteinia ternata (Barren Strawberry)*

Climbers for Shady Walls & Fences:

  • Akebia quinata, trifoliata
  • Clematis ‘Nelly Moser’
  • Euonymus fortunei ‘Coloradus’
  • Hedera helix (English Ivy)
  • Humulus lupulus (Golden Hops)
  • Lonicera japonica ‘Halliana’ (Japanese Honeysuckle)
  • Parthenosis henryana, quinquefolia, tricuspidata

*Does best in light shade
**Does best in medium to dense shade

Shade Perennial
Shade Perennial
Shade Perennial

Espalier

Espalier is the process of training trees or shrubs, by pruning and trellising, to create a vertical, two-dimensional, formal pattern. The purpose of espalier is to artfully train a tree to grow in limited space, to provide pattern and texture on a solid wall, to grow fruit in a limited space and to create privacy in the garden.

It is possible to purchase plants that have been already been espaliered, however, your selection of plant choices will be limited and it’s not nearly as much fun as doing it yourself. Fortunately, it’s not as hard to do as it may sound!

Espalier Basics

To begin, choose a spot in full sun where you have garden space at the foot of a bare wall or fence. It is important to remember to leave about 6 inches of space between the wall or fence and the plant to allow sufficient room for roots to grow. A wire frame is often used in place of a trellis when choosing this type of plant training, though a trellis may be used when training a plant for privacy when no wall is available. Screw eyebolts into the side of a building at 1-foot intervals, horizontally and vertically. Tie wire between the bolts to create a grid. There are many styles and patterns, of espalier to choose from, some simple, some complicated. It may help to layout your design on graph paper first to solidify your plan and to visualize its complete form.

Select a tree that is young as its branches will be more flexible and more readily trainable. All branches must be pruned from the side that will be flush with the wall or trellis. Tie the main trunk to the wire grid with a twist tie, then prune away all branches that grow forward leaving only laterally spreading branches. Next, begin tying the lateral branches to the frame at approximately a 45-degree angle from the ground. You now have the beginnings of an espalier! This process will require annual maintenance. Branches chosen to be part of your original design should be retrained and retied yearly. Check the ties twice a year to make sure that they are not strangling the branches, and loosen them as necessary. Branches that are not needed to maintain your design should be removed.

Pruning Your Plant for the Best Espalier

Pruning and training will continue throughout the life of your chosen plant. Generally, most major pruning is done in late winter to early spring before new growth begins, but pruning at different times can have different advantages. Pruning during the dormant season or early spring, for example, will stimulate new growth that can help fill a pattern in more quickly. Pruning in mid-summer (June, July) tends to have a dwarfing effect, ideal to keep a more mature plant under control in a smaller space. Pruning should not be done in late summer, however, as this could stimulate new growth that will not have time to harden off before a heavy frost sets in.

An espalier design can take years to fill into a luxurious form, but the effort and meticulous nature of this type of plant training can be well worthwhile for a unique and eye-catching feature in your garden.

Espalier

Growing Mint in Your Herb Garden

Many of us love mint. With many different flavors of mint available at garden centers, it is easy to want to plant one of each. Planning ahead makes this possible to do, but lack of planning may have you tearing them all out.

How Mint Grows

Mint grows as a groundcover. The underground runners spread quickly and are difficult to remove if containment is desired. In other words, mint is often considered invasive and can quickly take over flowerbeds, vegetable plots and even areas of turf near where it is originally planted. Planting in pots placed into the ground prevents its escape, or intensive labor may be needed to help get mint back to its original proportions after it has wandered.

Planting Mint

To help keep mint under control and more accessible for use, many gardeners opt to plant it indoors. Attractive in barrels or pots by the kitchen, mint leaves and flowers can be easily available for cooking or beverages.

To prevent plants from looking rangy, frequently cut or pinch back new growth. Pinching off the flower buds produces more lush leaves and fuller plants.

Mints grow well in sun or part shade, preferring well-drained but moist soil. Although not particular about soil type, enriching clay soil with compost will improve the overall plant appearance and taste. Different soil pH values and organic compositions may also have some minor influence on the taste of different mints.

Most mints grow 18-30 inches tall. Plant at least 2 inches apart to prevent cross-pollination of different varieties and preserve the best flavors. As a perennial, the plant may disappear in the winter, but will return in spring, hardier and more vigorous than ever.

Using Mint

It’s no surprise that mint is an edible favorite. Not only is it popular for refreshing drinks such as mint juleps or mint-infused lemonade, but it is also ideal for…

  • Sauces
  • Salads, especially fruit salad
  • Flavoring for cookies, cakes and puddings
  • Jellies and preserves
  • Smoothies
  • Soups and stews
  • Ice cream, gelato and frozen yogurt
  • Garnishes on meats
  • Freezing in ice cubes for a drink garnish

Mint can be used fresh for a strong, vibrant taste, or it can easily be dried and used all year long. Both fresh and dried mint sprigs can also be fragrant additions to cut flower arrangements, wreaths or other greenery decorations as well. With so many wonderful options for mint, you’ll want to add some to freshen up your herb garden today!

mint

General Soil Amendments

We’ve all heard of the importance of amending the soil properly for gardening and landscaping, but the number of soil amendments sold in garden centers often confuses gardeners. Which is which, and which will work best for your soil conditioning needs?

Types of Soil Amendments

Soil amendments fall into two basic categories, inorganic and organic. Inorganic amendments come from non-living materials such as sand, perlite, vermiculite and crushed stone. With the exception of limestone and gypsum, which are used to increase soil calcium, these are not commonly used in the garden.

However, organic amendments are the opposite. They come from previously living materials such as peat, manures and composts. When leaves, bark, peat, animals and animal wastes are mixed together to decompose, compost or “humus” is the final product. Very commonly used, these materials enrich the soil by increasing the air spaces, adding extra nutrients to the soil, improving the absorption of those nutrients and increasing overall soil fertility.

Why You Need Soil Amendments

Excellent soil is not common around most homes. Even if it was initially, house construction and roadwork often removes the good soil and construction equipment compacts the remaining soil. Furthermore, heavy use of the remaining turf – children and pets playing, for example – continues to compact the soil. Chemical treatments, runoff from gutters and downspouts, removal of existing plants, changes in local wildlife – all of these factors can wreak havoc on soil.

Adding organics loosens compacted soil and results in better gardens. Incorporate organics into the beds throughout the year by working evergreen needles, leaves and lawn clippings into the soil. Amendments such as peat or lime can improve a pH problem, if one exists. Calcium and magnesium deficiencies can be corrected using organic materials such as bone meal or wood ashes, or inorganic materials such as limestone, gypsum or soft rock phosphate.

Mulching is another simple way to add biodegradable materials to the soil. Simply place mulch around the plant, leaving several inches bare closest to the stem to discourage insect invasions and rot. In addition to slowly providing nutrients as it decomposes, mulching is attractive, reduces weeds and erosion, maintains soil temperature and prevents “crusting” that occurs when soil becomes too dry.

Another advantage of adding organics is the attraction of worms. They further assist in the decomposition, increase aeration and leave worm castings, a valuable organic material, behind. A healthy garden is home to many worms, and it all starts with adding organic soil amendments.

Whether you opt for organic or inorganic soil amendments, if you use them properly, you soil will improve and your landscaping, flowerbeds and garden will look better than ever.

Compost
Compost
Compost

Fungus Gnats

Have you noticed little black gnats flying around your houseplants or outdoor potted plants? These are probably fungus gnats. These can be a serious problem in commercial greenhouses holding thousands of plants but are easily controlled by homeowners who take appropriate steps for eliminating these pests.

What Fungus Gnats Need

As weak fliers, fungus gnats live in and around damp decaying material. Plants with fungus gnats are usually being overwatered. This is the primary cause for an increase in the gnat population, as they thrive in wet, organically-rich soil. Gnat grubs nibble on the tender roots of houseplants, but they do not generally do enough damage to severely harm the plant – they are more of a nuisance as they mature and fly around the plant. These gnats do not bite, but they can be annoying. When an infestation is bad, they can quickly spread from plant to plant, making them even more challenging to control.

Ways to Control Fungus Gnats

Letting a plant dry out between watering will decrease the decay and fungus in the soil, making the pot less hospitable for fungus gnats. Always make sure pots have adequate drainage and that water is not left standing in saucers. Adding a porous top-dressing, such as sand or gravel, to the pot can also help water drain away from the surface so the gnats cannot burrow down to the organic richness they crave.

For home use, insecticidal sprays with Pyrethrins are available and can be used against fungus gnats. If treating a houseplant, be sure to take plants outside and follow label instructions carefully, keeping the chemical away from children and pets at all times. Bacillus thuringiensis (BT), a biological control, will also provide relatively fast control killing the larvae in the soil.

For houseplants, the easiest and fastest remedy is often the best. Repot the infested plant using new potting soil into a pot with drainage. Carefully rinse the plant’s roots while repotting to remove as much soil as possible, and be sure the new pot’s hole is not clogged. Prune away any dead roots, leaves and stems. The gnats will be gone immediately.

To keep fungus gnats from returning, carefully check a plant’s moisture before watering to prevent moisture problems that can bring fungus gnats back in a flash. Water monitors can be used, or simply check that the top 2-3 inches of soil is dry before watering. Using watering bulbs or other waterers that are inserted deeply into the soil can also keep fungus gnats at bay by providing water directly to the plant’s roots, without saturating the entire pot.

Fungus gnats certainly aren’t fun when they infest your plants, but fortunately there are many ways to keep these bugs under control or eliminate them entirely. Using several techniques at once will be most effective, and the gnats will be gone just as fast as they first appeared.

Viburnums

Viburnums are one of the most outstanding groups of shrubs for use in landscape planting. Varying in height from 2-30 feet, viburnums can be found to suit most any planting location. Their varied growth habits, excellent foliage, striking and fragrant flowers, showy fruit and interesting winter appearance make them an excellent choice for most gardeners.

Which Viburnum to Choose

Effective in many situations, the smaller shrub forms, such as Viburnum carlesi ‘Compacta’ and V. opulus ‘Compactum’, are excellent for planting close to houses or in tighter spaces, such as narrow flowerbeds or in side yards. The larger forms, such as V. lantana and V. prunifolium, make good specimen and screen plantings to be a centerpiece in the garden or provide privacy. Which one will work best in your landscape will also depend on the available space you have, your soil type and the sunlight needs of individual plants.

Flowers and Foliage

Viburnum flowers, primarily white in color, are borne in clusters, ranging from a rounded snowball shape to a flat form. Large, white snowball clusters of florets are found on V. carlcephalum and V. macrocephalum. Half-round flower forms are borne on such types as V. carlesi and V. burkwoodi. Most of the others have a flat cluster of florets such as V. plicatum ‘Tomentosum,’ V. dilatatum and others.

Viburnum foliage can be extraordinary with types that include a velvety smooth leaf surface, bold rough-veined textures and glossy leathery character, all of which add more textural interest to the landscape. In addition, some forms have attractive fall leaf color such as the purplish red of V. dentatum and V. dilatatum, as well as the brilliant red of V. opulus.

Brilliant Berries

In the fall and winter there is also ornamental value with berries. Many viburnums produce lovely fruits in shades of red, pink, yellow and blue-black which not only add to fall and winter interest, but can also be attractive to birds and other backyard wildlife.

Viburnum Care

With so many many pleasing aesthetic features of these plants, how easy are they to care for? Easier than you may think! Viburnums are very hardy, resistant to serious pests, thrive in a variety of soil and environmental conditions and require little pruning. They will grow in either sun or shade; however, flowering and fruiting will be more profuse in a sunny location.

With so much to choose from and so many advantages to these shrubs, there’s sure to be one to suit all your landscaping needs. Stop in to consult with our landscaping experts today, and we can help you choose the perfect viburnum to complement your landscape.

Viburnums
Viburnums

Choosing the Right Flowering Tree

Purchasing a tree for your landscape is an investment that can raise the property value of your home and bring you pleasure, beauty and shade for many years to come. Selecting the proper flowering tree for your enjoyment is easy, just follow these simple guidelines and remember, we are here to help you with any of your gardening questions.

  1. Care
    Study your chosen planting environment carefully. Familiarize yourself with the sun patterns. Will your tree be in full sun, part sun or shade? What about soil type? Is it heavy clay or well-drained loam? Some trees will survive in poor soil, some will not. Is there a water source nearby? Having a clear understanding of your tree’s cultural requirements and characteristics of the site you have chosen will help you make a good match so the tree will thrive.
  2. Size & Form
    Consider the space where you will be planting the tree of your choice. Know the ultimate height and width of the plant that you choose to make certain that it will not outgrow the room you have allotted for it. At the same time, note the growth habits and sizes of nearby trees and shrubs to be sure they don’t crowd one another out in the years to come.
  3. Flowers
    Make note of when you would like your tree to flower. For instance, you don’t want flowers in August if that is when you are traditionally away on vacation. Many flowering trees are available in more than one flower color, depending on the cultivar. Choose the one that works best for you and your taste and looks good with whatever else you will have flowering at the same time.
  4. Other Ornamental Characteristics
    A higher value and more enjoyment is gained by choosing a tree with multiple seasons of interest. Look for a flowering tree that may also have interesting winter bark, persistent fruit or unique leaf coloration so you can enjoy its beauty in every season.
  5. Availability
    Frequently, folks will read about a unique new plant introduction and are disappointed when it is not yet available on the market or does not grow well in their area. To avoid disappointment, choose from our large selection of flowering trees in inventory. We pride ourselves on carrying plants that thrive in our area and can suggest an appropriate substitute for your desired tree.

With just a bit of careful consideration, you can easily choose a flowering tree that you will enjoy for many years to come.

Flowering Tree
Flowering Tree
Flowering Tree

Wild About Window Boxes

Window boxes can be an amazing addition to your home landscape, and they’re much more flexible and versatile than many gardeners realize. Take advantage of this great space and you’ll soon be wild about window boxes!

Choosing a Window Box

There are many types of window boxes available, from classic rectangles to wire frames with coir or sphagnum moss inserts. Wood and plastic boxes are also available, and they can be half-circles, have rounded ends on a longer box or may even be smaller boxes with pointed bottoms, a cone shape, suitable for just one or two favorite plants. While most window boxes are designed to be mounted beneath a window, they can also be positioned on a fence, deck railing or even a sunny patch of wall to add more beauty and growing space.

When choosing the best window box for your home, coordinate with the architecture of your house for a smooth, elegant look. Ideally, the box should be the same length as the window or just slightly shorter, but not so short that it looks out of place or unbalanced.

Window boxes come in a variety of popular or neutral colors, and some boxes can be painted to match your house’s window trim or siding exactly. When mounting the box, be sure it is securely supported so it will not tip or fall. Larger, heavier boxes may need additional brackets underneath to support the weight of a full box, taking into account not just the weight of the box itself, but also of the soil, water and mature plants.

Plants for Window Boxes

Any plants that are comfortable in small or medium-sized containers can thrive in window boxes. You may want to opt for flowers for a colorful accent to your home, or choose herbs, berries or even lettuce for a kitchen window box that will be easy to harvest. Small ornamental grasses and spreading ferns or spider plants are ideal choices for a green window box.

No matter what plants you choose, be sure they are suitable for the climate of the window box. Consider the amount of sun the box receives and when it may be shadowed throughout the day. Also note that window boxes against walls or fences, as opposed to boxes on railings, will receive more heat if the wall is dark in color. If the wall is white, it will reflect more light onto the plants.  Take not of overhanging roofs that will prevent rain from reaching your window box. Supplemental water will be a necessity in this case.

You can use just one type of plant in a window box for a bold statement, or you may prefer a mixed container that combines textures, shapes and color for a more dramatic look. Consider mounding plants that will easily be seen above the edge of the box, or trailing varieties that will gracefully drape over the box and soften any harsh edges. Symmetry and balance can be important in window boxes, so be sure to envision how the plants will look when mature so the entire arrangement will complement your home and other nearby landscaping.

Best Window Box Care

Just like any container, window boxes require unique care to allow plants to reach their full potential. Fortunately, if you mount a window box outside a window that can be opened, it’s easy to open the window for watering, weeding and pruning as needed. Use a rich potting soil that will provide abundant nutrition for the plants, and fertilize as needed for the type of plants you’re growing. A nitrogen-rich fertilizer is best for leafy plants and dramatic foliage, while a fertilizer that is heavier in potassium will encourage brighter blooms and more flowering.

Because window boxes are containers, they will need more frequent watering, even daily or twice a day depending on the climate and how thirsty the plants may be. To make watering less of a chore, consider using automatic waterers such as watering bulb that will keep your window box properly hydrated. When you water by hand, a small watering can with a thin spout is best, as you’ll be able to get water directly to the soil without wasting precious water on plant foliage where it will do no good and has the potential to burn delicate foliage in a sunny situation.

When tending window boxes, use small, hand-sized tools that won’t disrupt other plants in the crowded space. Thinning or pruning the plants regularly will help encourage new growth to keep the plants lush and the box full. If you’ve planted an edible window box with herbs or veggies, harvesting when the plants are ready will provide richer flavors and spur new growth to lengthen the growing season and increase the plants’ yield.

Decorating a Window Box

While the plants in your box may be decoration enough, a window box can also be a great space to add extra decorative flair to your home. The box itself can be wrapped with a ribbon to add more color or coordinate with the current holiday. Decorative plant stakes or small garden flags provide bright accents that can be switched out with different seasons and holidays. You might even create a small fairy garden in a window box, with a quirky gnome or other whimsical figure peeking out from the fun foliage. In winter, pine boughs can be layered in the box for ongoing greenery along with colored or natural branches, and a small strand of lights can even be strung along the box for a glittering twinkle. If you prefer to light your box up year-round, you might even carefully place a solar plant stake or two in the box to highlight the arrangement.

Window boxes are far more than just small planting containers – they can be beautiful accents to your home, an extension to your growing space and even a spot for fun whimsy in your yard. You can make them into whatever you like – don’t be afraid to go wild!

Window Box
Window Box
Window Box
Window Box
Window Box